Record-Enabling an Audio Track
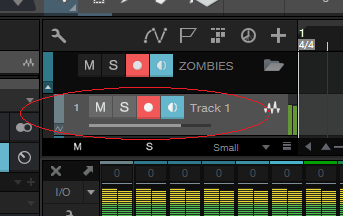
To record to an Audio Track, the Track must be record-enabled. To record-enable an Audio Track, click on the Track’s Record Enable button once or select the Track and press [R] on the keyboard. Select multiple Tracks and record-enable any of them to record-enable all selected Tracks. The Record Enable button turns red when active, and the Track’s meter begins to move up and down if there is live audio input on the Track’s selected Input Channel.

Alternatively, if you press and hold [Alt]/[Option] on the keyboard, and then click on Record Enable, you both record-enable the related Track and disarm record-enable for all other Tracks.
You can find the Audio Input Follows Selection in the Studio One/Options/Advanced/Console options list (Mac OS X: Preferences/Advanced/Console). Engaging this automatically record-enables the last Track selected in the Arrange view. Monitor-enable is, by default, automatically engaged when Record Enable is engaged.
When an Audio Track is record-enabled, a clip indicator appears at the top of the input-level meter for that Track in the Arrange view. If clipping occurs at the input, the clip indicator turns on. When clipping occurs, you should adjust the input gain/level on your audio interface, as once the distorted signal is recorded, it cannot be fixed.
Once an Audio Track is record-enabled, you are ready to record. Refer to Activating Recording for more on this topic.
Software Monitoring
To monitor (listen to) live audio input on an Audio Track, click on the Monitor enable button once. This button should turn blue, and you should begin to hear your live audio input and see its input level on the Track meter. You can also hold [Alt]/[Option] on the keyboard and then click on the Monitor enable button to simultaneously engage monitoring on a Track and disengage monitoring on all other Tracks.
It may be helpful to picture the signal path to understand exactly what is happening. For example, if you are listening to a guitar plugged into channel 1 on your audio interface, then Studio One receives the guitar input on Hardware Input 1.
In Audio I/O Setup, you will have created a mono Input Channel with Hardware Input 1 as its source. Your Audio Track has that Input Channel selected as its input. The Output of your Audio Track is likely to be the Main Output, which is a stereo Output Channel. The Output Channel sends to a designated stereo pair of outputs on your hardware audio interface, which presumably are connected to your monitor speakers or headphones.
When monitoring live audio input from a microphone, avoid listening with speakers that are in close proximity to the microphone. Otherwise, you might create a feedback loop that could quickly generate dangerously loud audio levels, possibly harming your ears and your speakers.