Please take a moment to understand the Firmware Recovery process and read all instructions carefully before continuing. A Firmware Recovery is a method of both updating the mixer's firmware and/or doing a factory reset of the mixer. If you are experiencing any strange behavior or problems with your mixer, a Firmware Recovery may be necessary to correct the issue. If you need to reset your mixer to factory defaults for any reason, a Firmware Recovery is the method you would use to do this.
NOTE: The Firmware Recovery is a complete re-flash of the mixer firmware, restoring the mixer to its factory default state. It will completely remove any user created scenes or presets, as well as any network information or other settings stored on the mixer, and rewrite all factory presets.
If you need to save your user created scenes and presets from your StudioLive Ai mixer, please follow this link below:
StudioLive AI Scene Preset Backup and Transfer
***************************************
It is highly suggested that when doing firmware updates or the Firmware Recovery process that you complete this process with a Sandisk drive as mentioned on the below knowledge base article. Some flash drives will not work correctly when doing these updates and will fail:
SanDisk Cruzer USB Flash Drive Compatibility with StudioLive AI
***************************************
Firmware Recovery Process
If you haven't registered your mixer, you should first do so here: https://my.presonus.com/
Next, review the instructions for the Firmware Update process as documented on your my.presonus account page, found in the Details section for your StudioLive-AI mixer listing, under My Hardware. You will be following the portions for downloading the firmware files and for placing them on your Fat32 formatted USB flash drive.
***************************************
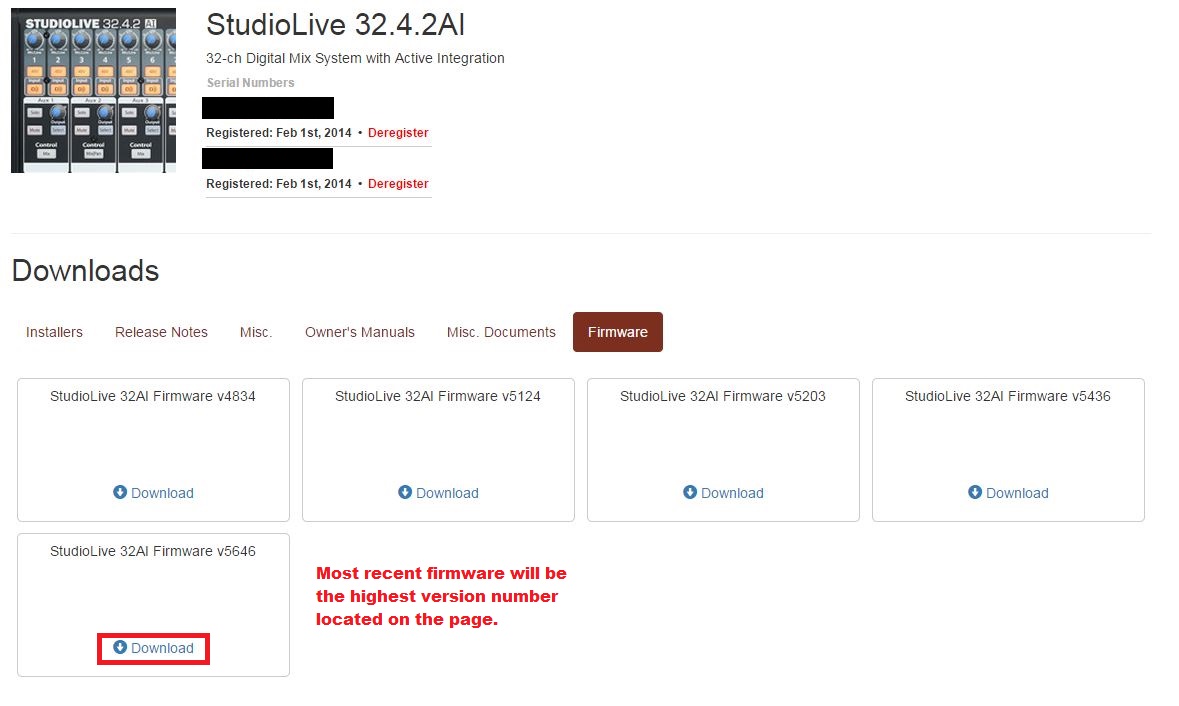
1. Download the firmware files for you mixer from your My Presonus account. To find these files, click on the "View More Details" link on your StudioLive registration and click the "Firmware" tab in the details area.
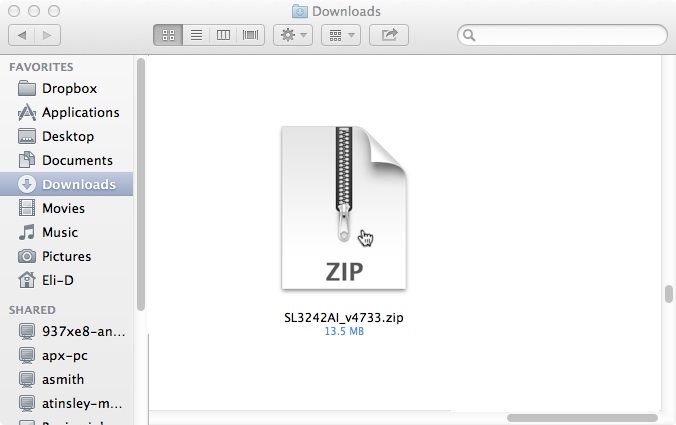
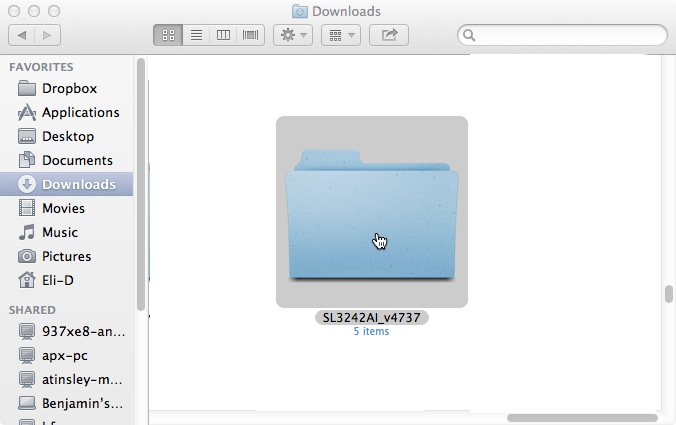
2. Open your downloads folder and locate the StudioLive-AI firmware download. The folder will be named with your mixer’s model number and the new firmware version (e.g., SL3242AI_v4733). Depending on your system preferences, the firmware folder may not automatically uncompress from the .zip file. To expand it, simply double-click it.
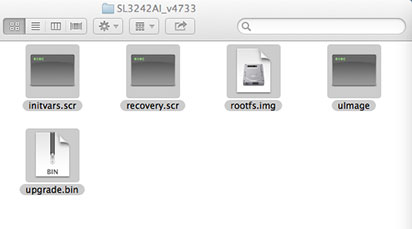
4. Open the firmware folder; you will find five files inside. You will need all five files to upgrade your mixer:
5. Connect a FAT32-formatted USB thumb drive to your computer. Power User Tip: Most small USB drives (16 GB or less) should be formatted correctly, but if your mixer does not detect your thumb drive at first, we suggest reformatting it again, even if it's already formatted as Fat32. On Windows, be sure to do a "Full" format as opposed to a "Quick" format. On Macs, the choice will be listed as MS-DOS (Fat)

6. Select all five firmware files and either copy/paste or drag them to the root of your thumb drive. Eject your drive and disconnect it from your computer.

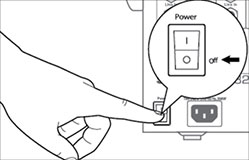
7. Turn off your StudioLive mixer. IMPORTANT: There will be a small pop on the outputs when the mixer boots after a firmware upgrade. Be sure to either disconnect the outputs of the mixer from any live amps and speakers, or power off the amps and speakers in addition to the mixer.
8. Next, take a Philips head screwdriver and on the back of the StudioLive mixer, loosen the screws securing the option card. Pull the option card out an inch or two so that it is no longer seated in its internal slot.

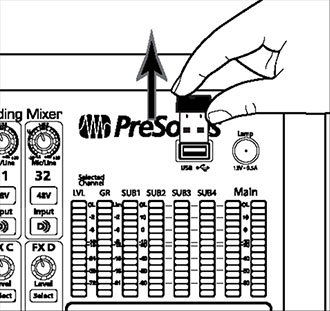
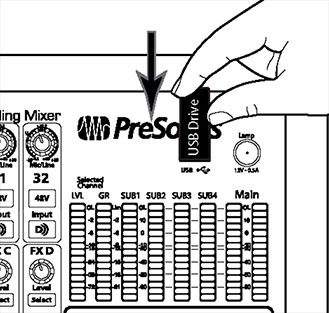
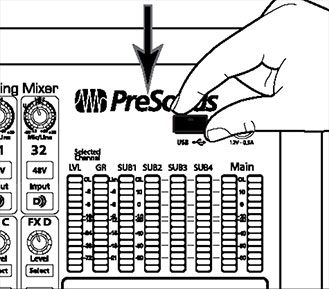
9. Remove the Wi-Fi LAN adapter (if connected). Plug the USB Flash drive into the USB port at the top of the mixer.
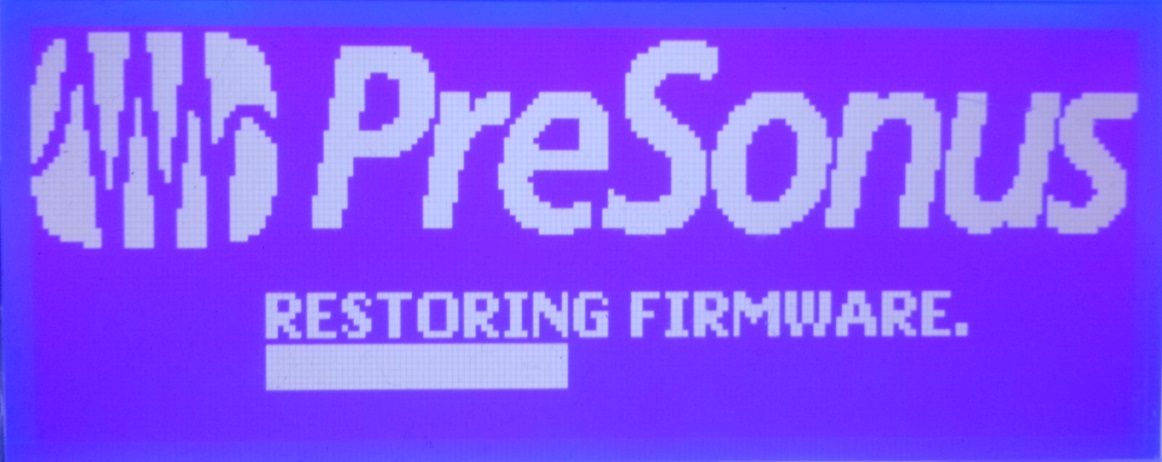
10. Power your mixer on and it will start the Firmware Recovery process, displaying the message "Restoring Firmware". Do not power your mixer off until instructed to do so. NOTE: This process should take about 10 minutes to complete. Once completed you will get a message stating: "Power off your mixer, insert the option card, and power the mixer back on."
11. Follow the directions, power off the mixer and re-insert the option card firmly to make sure it is seated. Re-tighten the thumb screws to secure the option card.
12. Remove the thumb drive. You can also insert your USB WiFi adapter (if you want to connect wirelessly to your router)

13. Power your mixer back on. Note: Be sure that your speakers are powered off or disconnected, as there will be a small pop when the mixer reboots.
14. It will take a minute or so for the mixer to complete the update. You may see a message on the screen about “Updating Control Surface”. Once the process is complete, your mixer will finish the normal boot process and be ready for use again.