*** IMPORTANT NOTE:
Please note the difference between downloading and installing a StudioOne versions build and activating StudioOne to unlock the core content that is included in a versions installed build. When you download and install StudioOne from any source, you are installing the build of that version; 2.0, 2.5.2, 2.6.0, 2.6.5, etc... In order to unlock the core content for your registered version; Demo, Artist, Producer, Professional, you must activate the installed build using the 28 digit product code or the offline 16 digit product key depending on your type of activation. The process of activation will then release the content for the registered version within StudioOne once properly activated.
*** The Free version will default to all installed builds of StudioOne version 2 if the activation process is bypassed!
* Below you will find instructions on downloading and installing Studio One from your user account. The online and offline activation process is linked below this outline at the bottom of this knowledge base article.
* The build located for download in your user account will always be the latest build available for download for that registered version.
1. If you are not already logged into your PreSonus user account, log into your account: https://my.presonus.com/
2. Locate the My Products tab at the upper right hand of the user section of your account once logged in.
Click this button to view your registered product lists.

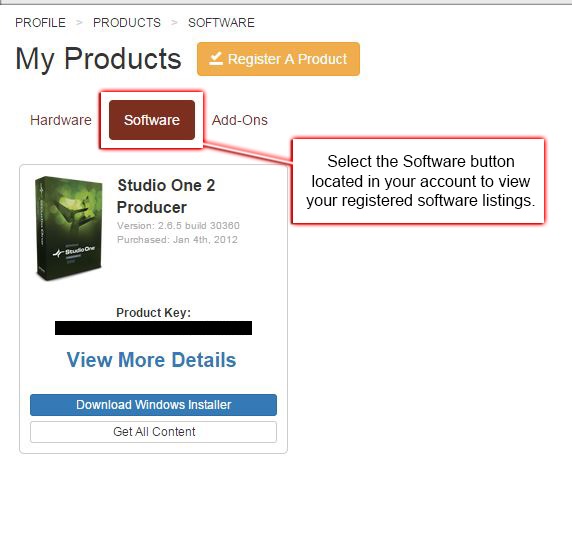
3. Locate the My Software button in your user account and click that button to view your registered software listings.

4. Once you have located the listing of your registered software, click on the link that says "View More Details" to view the installers for your system.
The website will intuitively read the system you are connecting to the website account with and offer the installer for that system. Windows users will see a 64 bit and 32 bit installer, whereas MAC users will see a MAC OSX installer. You can also select the option to View Other Systems link there in your registration of StudioOne to view all the system installers available for that registered software.

MAC OSX: The installer for MAC OSX is bit rate inclusive, meaning it will install both the 64 bit and 32 bit version in one build.

* See below for instructions on how to change the bit rate on a MAC for StudioOne.
Windows systems: The 32 bit (x86) version and the 64 bit version are separate installers. You will see both listed in your account when you connect using a Windows machine. The 64 bit version lists on the button (64 bit). Choose the appropriate versions bit rate build that you wish to install and download that version. Both the 32 bit and 64 bit versions of Studio One on a Windows machine can be installed separately, but only one build can run at a time.
How to identify your Windows operating system type (32-bit or 64-bit):
• Browse to your Control Panel.
• Select "System and Security" and then "system" if you are in the classic view, for the large or small ICONS view, simply choose "system".
• Under "System Type", it will list the operating system type as 32 bit or 64 bit.
Hint: Sometimes you may see 32-bit applications or system types labelled as "x86". 64-bit system types may also be displayed as "x64".
Mac OS X Users:
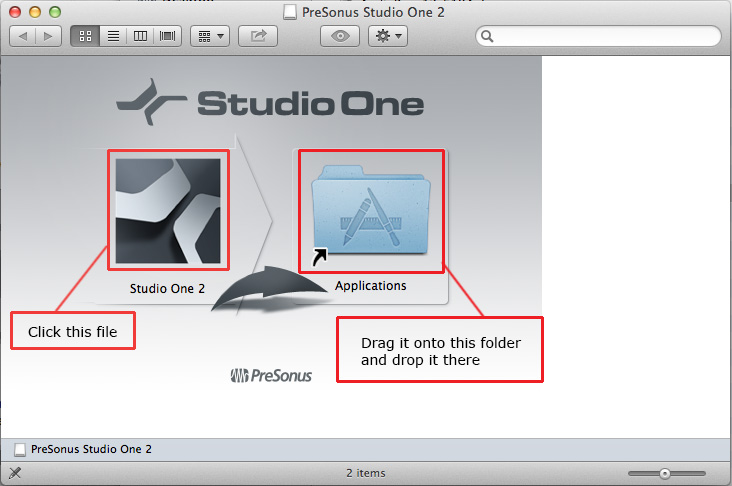
There is one Mac OS X installer for both 32-Bit and 64-Bit. It will be the "Download Installer for MAC" link. Open the .dmg file left click, hold, then drag-and-drop the Studio One icon onto the Applications folder to install the Studio One software.
Note: Studio One will run as 64-Bit by default on the Mac when installing build 2.6.4 or newer, older builds will default to the 32 bit version unless changed.
• To change the bit rate running on a MAC, locate the Studio One icon in your Applications folder.
• Right-click or Command-click and choose "Get Info".
• Under “General,” un-check the option to run as 32-Bit. The next time Studio One runs, it will run in 64-Bit mode.
Once the Studio One is properly installed into the Applications folder of your Mac, you can drag it to your Mac's "Dock" to create an alias (shortcut) to the original program file, which should continue to reside in the Applications folder.

Proceed to Activation steps next:
• If your computer will be connected to the internet when using StudioOne, do an ONLINE activation:
- [3] Software Activation (Online Computer)
• If your computer will not be connected to the internet when using StudioOne, do an OFFLINE activation:
- [4] Software Activation (Offline Computer)